So you want to learn to knit. OK, this post isn’t going to teach you how but you can consider it a preliminary class on what you will need to get to that knitting place.
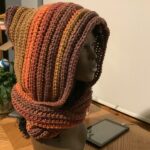
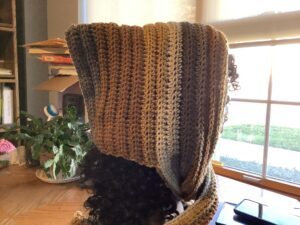
 But first, you will notice the photo is crochet. And you would be right. They’re the latest hooded scarves. Just wanted you to know there were others out there and
 already in the shop. Now, on to the knitting.
I take a knit or crochet project to work on when I do a craft show. One, there is always a lull and I might as well be productive and two, it shows I do the actual work. This always causes at least one person (more than one) to comment how they always wanted to learn how to knit or crochet because their mother, grandmother, great aunt, a friend of a friend’s second cousin once removed on her father’s side, knew how and they made gorgeous stuff and they should really pick it up again.
If this is you, and you want to get into knitting, I will go over some of the things you need to know. Knitting is fun, relaxing and productive. It is also a sport. As much as I would like to think absolutely everyone can learn to knit, not absolutely everyone can. But for those fortunate few (million) this is one of the greatest skills in the world.
First, the materials
There are things you will need in order to start any project:
Yarn (or some kind of fiber, let’s start with yarn) Acrylic is the most affordable or you can go to any of the natural fibers. Purely preference
Knitting needles – you can knit with two to five needles. Let’s start with two. The yarn label will give the recommended needle size. I suggest starting with bamboo needles as they don’t slip as much as metal ones.
Scissors – you will have to cut something
Tape measure
Yarn needle – you will need this to weave in the ends.
Stitch marker (optional but fun)
Row counter – which can be as simple as a pen and paper
Knitting – Let’s start at the beginning
There are only two stitches in knitting: the knit stitch and the purl stitch. There are two other pseudo stitches: the yarn over and the slip stitch. Every pattern will use at least one of these. In order to start, you will have to cast on. Once you’re done with all the knitting and purling, you will then cast off.
Casting on is the action that gets your first yarn onto your needles so you can work them. The two most common cast ons are the long tail cast on. There are other styles and you can learn them as you need them. But when you first learn, you will likely be taught one of those. There are dozens of YouTube videos that can show both methods.
The Knit Stitch – Right handed knitters
This stitch is the foundation of knitting. To make a knit stitch, hold the needle with the cast-on stitches in your left hand and the empty needle in your right. Insert the right needle into the first stitch from left to right so the needle ends up behind the left needle, wrap the yarn around the right needle, and pull it through to create a new stitch on the right needle. Slide the old stitch off the left needle. Repeat this process until you’ve knitted all the stitches on the left needle.
The Purl Stitch:
This stitch is the complement to the knit stitch. With the needle in your left hand, insert the right needle into the first stitch from right to left so the right needle ends up in front of the left, wrap the yarn around the right needle, and pull it through to create a new stitch. Slide the old stitch off the left needle and repeat for each stitch on the row.
Binding Off:
Also called “casting off,” this technique finishes your knitting project and keeps the stitches from unraveling. To bind off, knit the first two stitches, then use the left needle to lift the first stitch over the second stitch and off the needle. Continue this process until one stitch remains. Cut the yarn, leaving a tail, and pull it through the last stitch.
Once you’re comfortable with the knit and purl stitches, you can start making simple patterns. Here are a few beginner-friendly patterns to try:
- Garter Stitch: Knit every row. This creates a stretchy, bumpy texture that’s perfect for scarves and blankets.
- Stockinette Stitch: Alternate between a row of knit stitches and a row of purl stitches. This creates a smooth, “V” pattern on one side and a bumpy texture on the other, often seen in sweaters and other garments.
- Ribbing: This pattern is created by alternating knit and purl stitches in the same row. For example, a “2×2 rib” means knitting two stitches, then purling two stitches across the row. Ribbing is commonly used for cuffs and edges because it’s stretchy.
As with any new skill, learning to knit requires patience and practice. Here are some tips to help you along the way:
- Start Small: Begin with small projects like a dishcloth or scarf. These projects are quick to finish and help you build confidence in your skills.
- Watch Tutorials: Videos are incredibly helpful for beginners to see how to hold the needles, yarn, and how to execute each stitch. There are plenty of free tutorials available online.
- Don’t Worry About Perfection: Mistakes are a part of the learning process. If you drop a stitch or knit one stitch incorrectly, don’t be discouraged. With practice, these mistakes will happen less frequently, and you’ll learn how to fix them.
- Count Your Stitches: It’s easy to accidentally add or drop stitches, which can alter the shape of your project. After each row, quickly count your stitches to ensure you have the correct number.
- Practice Tension: Consistent tension helps your stitches look even. New knitters often knit too tightly or too loosely. Try to keep your stitches loose enough to slide easily on the needle but tight enough to maintain a neat appearance.
- Gauge: Somewhere along the line, you will learn about gauge. It is making sure the measurements of your piece are accurate. Not so important on somethings but very important on others.
When you finish knitting, it’s time to complete your project with a few finishing touches:
- Bind Off: Use the binding off technique mentioned above to secure your stitches and give your project a clean edge.
- Weave in the Ends: Use a tapestry needle to weave the loose ends of yarn into your project. This step not only makes your project look neat but also secures the ends so your knitting doesn’t unravel.
- Blocking: This optional step can improve the appearance of your project, especially if you’ve made a lace or intricate pattern. To block, soak your project in water, gently squeeze out the excess, and pin it flat to dry. Blocking evens out stitches and can help your project hold its shape.
Explore Patterns and Projects
After mastering the basics, you’ll be ready to tackle more complex patterns. Here are a few project ideas to inspire you as you continue learning:
- Scarves: Scarves are classic beginner projects. You can practice different stitch patterns and learn how changing yarn types affects the look and feel.
- Hats: Hats introduce circular knitting and decreases, giving you a chance to expand your skills.
- Blankets: A basic blanket with simple stitches is a great long-term project and provides plenty of practice.
- Washcloths or Dishcloths: These small projects are excellent for practicing stitch patterns and make useful, eco-friendly items.
Join the Knitting Community
One of the joys of knitting is becoming part of a welcoming community of fellow crafters. Many knitters join local knitting groups, online forums, or social media communities where they can share their projects, learn new techniques, and gain inspiration. Consider joining sites like Ravelry, where you can browse patterns, track your projects, and connect with other knitters around the world.

