10 crochet essentials. If you want to learn how to crochet or improve that skill, these are things you will need to know.
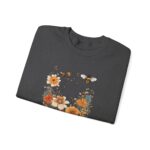
 But first, before we get into the nuts and bolts of those essentials, I want to take a moment to show the latest addition to Abbey & Lincoln, the Flowers and Bees sweatshirt. It’s a cozy short, 100% cotton and perfect for gardeners, nature lovers and flower enthusiasts. It’s available in the shop right now in a multiple of sizes and colors.
Now, let’s talk crochet.
I admit: I still like knitting better. I find I am doing more and more crochet projects because crochet is faster and the movement is more artistic, but I like the looks of the end result better when it’s knit. But crochet is still growing on me. Most of the people in my knit group crochet and as I continue to do more of it and hear people say  they want to learn how to do it, the more this list became necessary. So, if you want to jump on the knitting bandwagon, here are some ‘good to knows.’
Slip Knot and Foundation Chain
You are either going to start your project with a slip knot or a magic loop (more on that later.)
The slip knot is where it all begins. It’s the starting loop on your hook and the foundation of every crochet project. The foundation chain is the first row of chain stitches that anchors your work. Mastering a uniform chain tension will set you up for success in your project.
Tips:
- Practice making your chain loose and even, as it will help the rest of your stitches stay consistent.
Let me say for the record that I hate calling a stitch a chain. The entire thing is a chain, the individual things are stitches. So when the instructions say ‘chain 6’. I’m ok with that. When they say place your hook in the second chain, there is no second chain; there’s a second stitch. Putting away my soap box now.
Single Crochet (SC)
The single crochet is one of the simplest stitches but also one of the most versatile. It creates a dense, textured fabric and is commonly used in amigurumi, scarves, and blankets. Single crochet is often the first stitch beginners learn and is a foundation for more advanced stitches.
Tips:
- Keep your tension relaxed to avoid making stitches too tight.
- Single crochet is great for creating solid pieces without holes.
. Half Double Crochet (HDC)
The half double crochet stitch (my personal favorite) strikes a balance between the height of a single and double crochet. It creates a thicker fabric with a bit more drape than single crochet, making it ideal for sweaters, hats, and cozy scarves.
Tips:
- The extra yarn-over in half double crochet adds height to your stitch, so use it when you want a less dense fabric but still good coverage.
Double Crochet (DC)
Double crochet is a taller stitch that creates a looser, more open fabric. This stitch is perfect for airy garments, lightweight blankets, and projects where you want to work up rows quickly.
Tips:
- Double crochet is ideal for lacy patterns and blankets that need more drape.
Treble Crochet (TR)
The treble (or triple) crochet stitch is the tallest basic stitch. It produces an open fabric and adds height, making it perfect for lacy designs, shawls, and scarves.
Tips:
- This stitch is great for creating open, airy patterns. But be careful with tension, as it can get too loose.
Magic Ring (Magic Circle)
The magic ring is a technique used for starting projects in the round, like hats, amigurumi, and doilies. Unlike a foundation chain, the magic ring allows you to pull the loop tight, leaving no gap in the center of your work.
Tips:
- Practice pulling the ring tight to avoid gaps in the center of your circle.
- Use this technique to create a more polished look for round projects.
Increasing and Decreasing
Increasing adds stitches to your row or round, while decreasing removes stitches. Mastering these techniques opens the door to shaping garments, hats, and intricate designs.
Tips:
- To increase, simply add two stitches in one stitch space.
- For decreasing, crochet two stitches together to reduce stitch count gradually.
Front and Back Post Stitches
Front and back post stitches add texture and dimension to your work by working around the post (vertical part) of a stitch rather than into the top loops. These techniques are commonly used for creating ribbing, cables, and basketweave textures.
Tips:
- Experiment with these stitches to add texture to blankets, sweaters, or home decor items.
- These stitches can be a bit tricky at first but add a lot of dimension to your projects.
Color Changing
Adding color changes adds life and creativity to your projects. Mastering this technique allows you to create patterns, stripes, and even pictures within your work.
Tips:
- Make color changes at the last yarn-over of the previous stitch for seamless transitions.
- Weave in loose ends as you go to keep the back of your work tidy.
Blocking
Blocking is the finishing technique that makes your work look professional and polished. It involves wetting or steaming your piece and shaping it to the correct size and shape. Blocking helps stitches relax, and it’s essential for projects like lace shawls and garments.
Tips:
- Use rust-proof pins and a blocking mat for best results.
- For delicate yarns, steam blocking is often gentler than wet blocking.
If I were to add one more, it would be gauge. I don’t often pay attention to gauge because it really isn’t essential with what I make. I can even make hats and disregard gauge. But if you’re make more fitted garments, this becomes important to the sizing is correct.
There you have it, the things you need to know to have hours of relaxing and productive fun with crochet!

